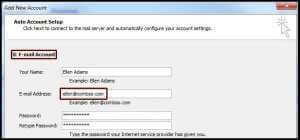
The Auto Account Setup wizard will start and request information. Example such as type of account, your name, e-mail address, and password.
Select “E-mail Account,” type in your name or a display name for the account. Type in the full e-mail address “user@domain.com”. (note that user+domain.com will also work in the cPanel environment), and your password twice.
Then, click Next.
The wizard will test the settings and should show, you a successful and complete message once it finishes. If it does not, you will see an error message. Click Next to see an option allowing you to “Manually configure server settings.”
If you do need to manually configure the server settings, you will be taken through another series of similar prompts.
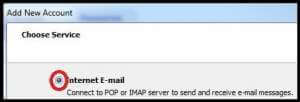
Step 2: Manually Configure Server Settings
Firstly, select Internet E-mail.
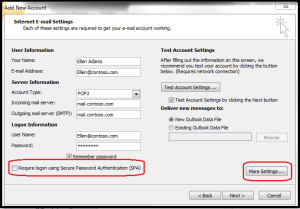
Type in your name and your e-mail address.
Select the account type as POP3 or IMAP. Type yourdomain.com for the incoming mail server, and yourdomain.com for the outgoing mail server. [Replace yourdomain.com with the name of your domain.]
User name: enter in your full email address in the format user@domain.com. (note that user+domain.com will also work)
Fill in your password and check the “Remember Password” box if you do not want to type it in each time you connect to your account.
DO NOT check the “Require logon using Secure Password Authentication [SPA]” unless that has been activated or configured by you or a web developer.
Step 3: Configure Other Settings
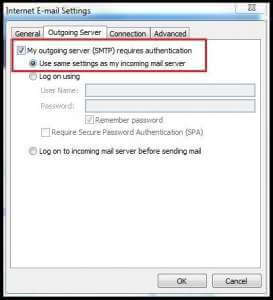
Firstly, click on More Settings and then Outgoing Server.
Then, check the box that says My Outgoing server (SMTP) requires authentication. Also, choose the option that says Use same settings as my incoming mail server.
Click on Advanced. Make sure the Outgoing server (SMTP) port number is set to 2525.
After that, click OK.
And then, Click on Next to see the “Congratulations” page. Lastly, click Finish.